

GameDev in JS "The Canvas"
Let's take a deep dive into GameDev in JS. I've been making games in javascript since 2014. It's super fun as you can build something and share the demo straight away. No need to compile or build for certain platforms. Just write the code and see it work in a web browser.
Writing code is fun, and writing games in JS is a joy. Do not let negative nancies like Jonathan Blow or other social media sensations tell you otherwise. Just remember, haters gonna hate.
The Canvas
The web browsers contain this amazing thing called the canvas. It's a html element and web standard that lets you paint on the screen. It's literally your canvas to fill with whatever you like. You'll hear me say things like "draw on the canvas" during this blog post series. When you hear that, think of an artist standing at an easel about to put a big smudge of paint on their own canvas. That artist is you. Be creative, don't get bogged down in "clean code" or any of that non-sense. Fun is the priority here.
So without further ado, let's create our own canvas to draw on.
Firstly we are going to need to create a html file. The entry point of our
game is going to be a html file. It's what the browser needs to get things
started. Let's name our file index.html. If you have any experience of
building stuff on the web, you will know what index.html is the entry point
for pretty much every web applications, it may even be a standard. People
on the web love making standards.
We don't need to put much in our own index.html, just the following.
<html>
    <head>
    </head>
    <body>
        <script src="./game.js"></script>
    </body>
</html>
The above html page does one simple thing, it loads a file called game.js.
This is the file that will contain all our game code. It doesn't exist yet.
So we better create it and some content to it.
touch game.js
The first thing we need to do is create one of these canvas elements you've
been hearing so much about. The canvas element is created the same as any other
html element, using document.createElement. We should create the element add it
to our html document and give it a height and width, then get a special thing
called the context. The context is what makes the magic happen.
const c = document.createElement("canvas")
const w = c.width = 600
const h = c.height = 800
const $ = c.getContext("2d")
document.body.appendChild(c)
The above code snippet, which you should add to you game.js file, contains the
code we need to get started. It creates a canvas element and assigns it to the
variable c. It then sets the canvas width to 600 pixels and height to 800 pixels,
assigning them to the vars w and h in the process. It then gets the canvas' context
and assigns it to the var $. Finally it appends the canvas element to the html document.
This is step is required in order for us to actually view the canvas.
Now if you open your index.html page in a web browser, you will see a white screen. Not
very exciting. This is because we have not yet drawn anything on our canvas. Let's use the
context to fill the canvas with a big black rectangle.
The Context
The context is what allows us to draw on the canvas. Each canvas has it's own context. The
context we will be using is an instance of a CanvasRenderingContext2D. This is important
to know if you want to look up the docs and dive deep into what it can do. For this series
you just need to know that the context is what we use for drawing on the canvas.
One of the first things any aspiring JS gamedev will do is draw a rectangle (rect) on the screen.
To do this we use the drawRect context method. It takes an x and a y coordinate, the position
of the rect, and a width and height value, the size of the rect.
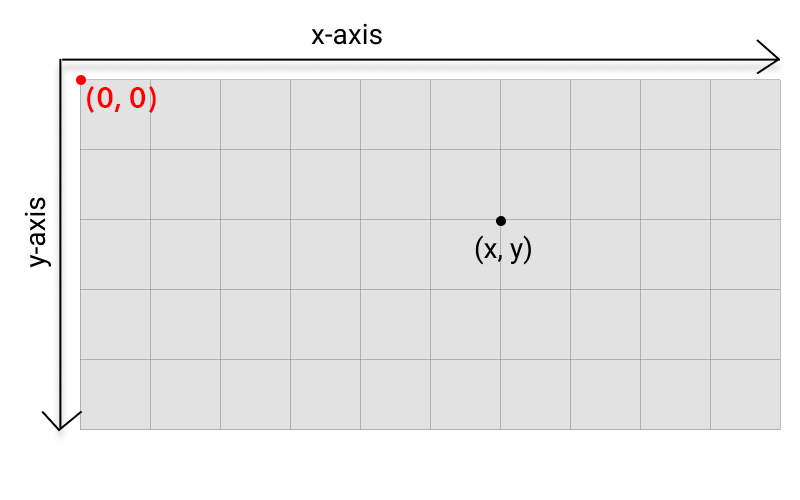
It's important to note that when I mention x and y coordinates I am usually talking about the position of the thing on the canvas. Think of the canvas as a graph. The x axis begins at the top left and travels to the right. The y axis also begins at the top left, but travels down. So the begining of both axis' is at the top left, represented by (0, 0). The last visible points of a canvas woudl be it's width value on the x axis and height value on the y axis. So the bottom right of the screen would be represented by (width, height).
Here is a small diagram to help you understand.
So now, if we wanted to fill the whole canvas with a rect we would start at x of 0, y of 0, and fill
to the width and height. This is done with drawRect, like so.
$.drawRect(0, 0, w, h)
If you refresh your page, you should now see a black rectangle on your screen. How exciting, you've drawn something to the canvas. It kinda sucks, but thats the first step to getting kinda good at a thing.
Next Time
We covered the very basic aspects of using the canvas element in this post. Because of this we don't have much to show for it. But in the next post we will be drawing images on the canvas and getting pixel art to look nice and crisp. Which isn't as straight forward as you may think.